
Why should you know how to lace up metatarsal guard? Because a MetGuard metatarsal protector can be life-saving if you are involved in highly risky jobs.
Construction site workers, miners, linemen, arborists, engineers, and workers dealing with heavy machinery, warehousing, and transportation are prone to accidents that can severely injure the feet. Heavy or sharp objects can accidentally fall on the feet and fracture or sever the metatarsal bones. Having met guard protection can keep you safe at the workplace and prevent such deadly hazards.
Be assured that the whole process of lacing up an external met-guard is not at all cumbersome. You can use it to equip your everyday safety toe boots with metatarsal protection unless your boots don’t have a built-in metguard. This short guide on how to lace up metatarsal guard will teach you to do the job in a few minutes.
Contents
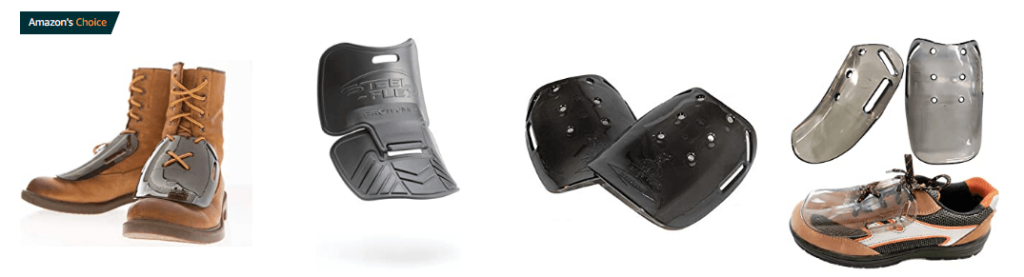
Some good Metatarsal Guards:

We hope you love the products we recommend! Just so you know, when you buy through links on our site, as an Amazon Associate we may earn an affiliate commission. This adds no cost to our readers.
Understanding Your Metatarsal Guard
The metatarsal area of our foot is one of the most vulnerable parts of our body when it comes to workplace hazards. That’s why it’s essential to protect it with proper gear. And when it comes to protecting your metatarsal area, no gear is as important as the metatarsal guard.
Before we dive into the process of lacing up a metatarsal guard properly, let’s first take a look at the different parts of a typical metatarsal guard and their functions.
Overview Of The Different Parts Of A Typical Metatarsal Guard
A typical metatarsal guard is composed of several parts. Understanding the function of each part is essential in ensuring maximum protection and comfort for your feet. Here are the parts of a typical metatarsal guard:
- Metatarsal plate: This is the hard plastic or steel plate that sits on top of the metatarsal bone and provides protection against heavy falling objects or compression.
- Tongue: This is the flap of material that goes underneath the laces and runs vertically up the front of the guard.
- Lace holes: These are the holes on the sides of the guard where the laces pass through, holding the guard in position.
- Shank: This is the part of the guard that covers the instep and provides support for the foot.
Importance Of Size And Fit
Since metatarsal guards are designed to protect your feet, they should fit snugly and comfortably. The right fit guarantees maximum protection and also aids in preventing discomfort while wearing the guard. Here are some tips to ensure the right size and fit for your metatarsal guard:
- Measure your foot: Use a tape measure to measure the length and width of your foot. This will help you determine the correct size of the metatarsal guard to buy.
- Try them on: Before buying metatarsal guards, try them on with socks and shoes similar to what you’ll be wearing on the job. This ensures a perfect fit and maximum protection.
- Adjust the laces: Once you get the correct size, ensure that you adjust the laces to fit your foot snugly. Adjust the tension until you feel comfortable but secure.
How To Properly Position Your Metatarsal Guard
Proper positioning of the metatarsal guard is crucial to guarantee maximum protection and comfort. Here are some steps to follow in correctly positioning your metatarsal guard:
- Put on your socks: Always wear socks underneath your metatarsal guards, helping in reducing friction and wicking moisture away.
- Put the guard on your foot: Place the metatarsal guard over your foot and align it so that the tongue is centered.
- Lace the guard: Begin to lace up the guard, ensuring that the laces go through all the holes and tighten them evenly.
- Ensure comfort: Make sure that the guard is secure but not too tight that it restricts movement or circulation in your foot.
- Secure it in place: Tie the laces once you get the perfect fit, and double knot them to ensure that they don’t unlace while working.
When it comes to lacing up metatarsal guards, it’s essential to take care with each step. Following the above guide will help you achieve maximum protection while keeping you comfortable.
How To Put On Metatarsal Guards?
Just follow the steps mentioned below to know how to lace in metatarsal guard:
- Purchase a pair of good MetGuard metatarsal protectors from the brand you trust. We’ve recommended some good ones above.
- Remove the lace from one of your boots and keep it aside.
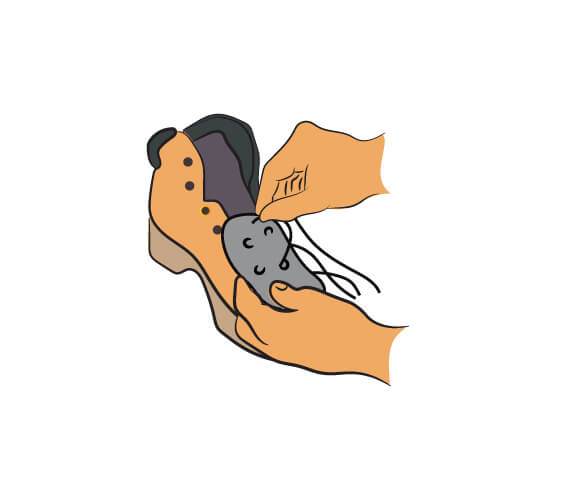
- Take out one of the metguard protectors and locate the holes made into it.
- Put your foot inside the boot. Insert the shoestring through the two holes made on the bottom of the metguard. When you hold the metguard, the part having the strap to fasten onto the shoe is the top portion, and the other end is your bottom side that faces the toes. So, the shoestring should loop in through both the holes at the bottom.
- Now, place the bottom part of the metguard on your metatarsal area.
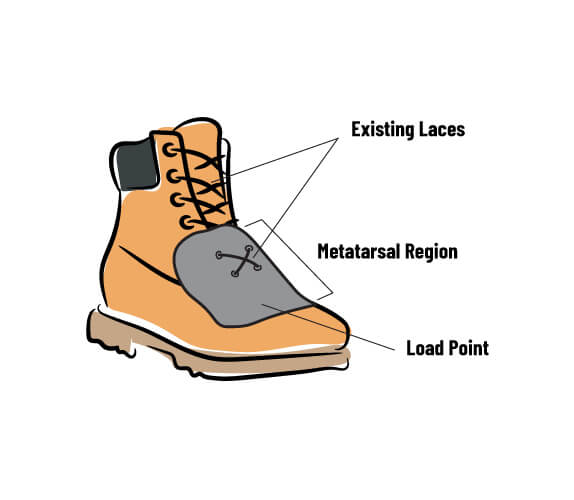
- Locate the eyelets made on the boot to tie up the shoelace. Start with the first row of eyelets sitting right on your metatarsal area or the instep. The series of eyelets end near your ankle.
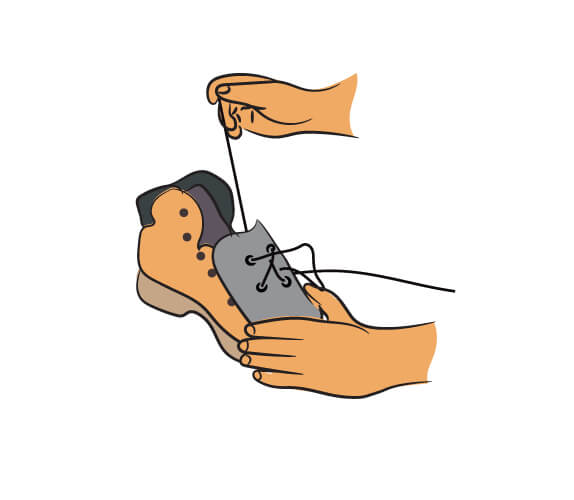
- After you place the met guard protection on the instep, take the end of the shoestring on your right hand and pull it through the first eyelet on the left side, and draw in the one in your left hand through the first right eyelet.
- Pull them snugly to ensure you have a correct fit. If you keep things loose here, the met guard will be sloppy and will keep shifting as you walk.
- Repeat the criss-cross pattern with each pair of eyelets, giving a snug pull at each step as you lace in metatarsal guard.
- When you reach the last pair of eyelets, tie up the lace in a secure knot.
- Ensure that the front part of the metguard on your instep is sitting tightly.
- Now, take the top part of the metguard, with a strap attached to it, and pass it inside the shoestring you laced up. Pull it out from the top just near the bow made with the shoelace ends. Then, attach it to the hook or button made at the base of the strap. This keeps it securely fixed to the boot.
- Repeat the same procedure with the other boot.
Some met guards have a different mechanism and come with holes in the middle. They also have rear and middle straps, in some cases. The basic procedure of lacing up shall remain the same, with a few alterations. In such cases:
- Draw in the shoestring in a criss-cross ‘X’ type shape through the four holes on the middle of the met guard.
- Place it on your instep area and begin lacing up in a criss-cross manner again, starting with the first set of eyelets.
- Pull out the shoestrings through the top two holes made on the met guard.
- Keep lacing up in a criss-cross pattern through the other set of eyelets till you reach the ankle.
- Remember to pull tightly at each step to ensure that the met guard sits securely. Fasten a bow at the end to ensure a snug fit.
- Some met guards also have side and rear straps that go around your feet for extra protective fitting. They are also useful for boots that do not come with a lace-closure pattern.
Following the guide should teach you how to lace up metatarsal guard aptly and provide yourself premium protection at the workplace every day. Go through the steps discussed carefully, and practice a few times to go about it like a pro.
How To Lace Up Metatarsal Guard ?
Proper Preparation
Ensuring That Your Shoes Or Boots Are Appropriate For Metatarsal Guards
Before we get into the proper way to lace up metatarsal guards, it’s essential to ensure that your shoes or boots are compatible with them. Follow these tips to make sure you’ve got the right footwear:
- Check the manufacturer’s instructions to ensure the metatarsal guard is compatible with your shoes or boots.
- Make sure the shoes or boots have enough room for the metatarsal guard to fit comfortably without crowding your toes.
- It’s recommended to wear safety-toe footwear with metatarsal guards since it provides added protection from falling objects.
Preparing Your Laces For Proper Lacing
Now that you have suitable footwear for your metatarsal guards let’s talk about preparing your laces:
- Choose a strong, durable lacing material that won’t fray or break easily.
- Before lacing up, tie a small knot at both ends of the lace to prevent fraying.
- Remove any leftover laces from your shoes to avoid entanglement and ensure easy installation of the metatarsal guards.
Tips For Optimal Comfort And Support
Here are some tips to help improve comfort and support when lacing up metatarsal guards:
- Make sure to lace the boots or shoes snugly but not too tight, allowing for movement and blood flow.
- Start lacing at the bottom and work your way up towards the top for a more secure fit.
- Use the lace hooks or eyelets at the top of the lacing area to prevent the tongue of the shoe from shifting while walking.
Following these steps should guarantee proper lacing when you’re putting on your metatarsal guards. Remember, it’s important to have comfortable and secure footwear for the best protection on the job site.
Lacing Techniques
Demonstration Of The Traditional Criss-Cross Lacing Technique
The traditional criss-cross lacing technique is a simple and effective way to lace up your metatarsal guards, ensuring maximum protection for your feet. Follow these steps to lace up your guards using the traditional criss-cross lacing technique:
- Thread the lace into the bottom left eyelets of the guard, and pull it through until the ends are even.
- Cross the lace ends, and feed them through the second set of eyelets on the opposite side.
- Lace the ends through each set of eyelets, alternating sides and forming a criss-cross pattern until you reach the top.
- Tie the ends of the laces to secure the guard in place.
Alternative Lacing Techniques Suitable For Metatarsal Guards
While the traditional criss-cross lacing technique is popular, there are other lacing techniques that you can use to lace up your metatarsal guards. Here are some alternative lacing techniques:
- Straight lacing: Feed the laces straight across each set of eyelets, tying them securely at the top. This technique puts less pressure on the top of your foot, but may not be as secure as criss-cross lacing.
- Heel lock lacing: Feed the lace ends through the top eyelets, and then loop them back through the adjacent lower eyelets before tying them off. This technique provides extra support and prevents slippage, but may be difficult to adjust.
- Loop lacing: After feeding the laces through the bottom eyelets, feed them through the loops on the sides of the guard and tie them off. This technique distributes pressure more evenly, but may not be as secure as the criss-cross technique.
Dos And Don’Ts Of Lacing Your Metatarsal Guards Properly
Properly lacing up your metatarsal guards is crucial to ensuring maximum protection for your feet. Here are some dos and don’ts to keep in mind:
Dos:
- Choose a lacing technique that feels secure and comfortable for you.
- Lace up your guards tightly to prevent slippage and injury.
- Make sure your laces are tied securely, with no loose ends.
- Trim excess lace length to prevent tripping hazards.
Don’ts:
- Don’t leave too much slack in your laces, as this can cause slippage and instability.
- Don’t tie your laces too tightly, as this can cut off circulation and cause discomfort.
- Don’t lace up your guards in a way that causes pressure points or discomfort on your feet.
- Don’t forget to check your laces periodically throughout the day to ensure they are still securely tied.
Remember, proper lacing of your metatarsal guards is essential to ensure that you get maximum protection for your feet. Use the techniques and tips outlined above to keep your feet safe and comfortable, whether you’re at work or enjoying your favorite sport.
Common Mistakes To Avoid
Identification Of Common Mistakes Made In Lacing Metatarsal Guards
Lacing up metatarsal guards can be a tricky task, and there are some common mistakes to avoid during the process. Here are some key points to keep in mind:
- Not lacing up all the way: One of the most common mistakes is not lacing up the guard all the way, leaving the top of your foot exposed. This can lead to injuries to your midfoot and toes.
- Lacing too tightly or too loosely: If the guard is laced too tightly, it can restrict your foot’s movement and impact your performance. On the other hand, if it is laced too loosely, it may not provide sufficient protection.
- Lacing in the wrong order: Another common mistake is lacing the guard in the incorrect order, leading to discomfort and inadequate protection.
Tips And Advice On How To Avoid These Mistakes During The Lacing Process
Lacing up metatarsal guards may seem like a daunting task, but it doesn’t have to be so. Here are some tips and advice to make sure you avoid the common mistakes stated above:
- Take your time and make sure to lace the guard correctly. It is better to spend an extra few minutes lacing up properly than to regret a mistake later.
- Use adequate pressure when lacing up the guard. It should be tight enough to stay in place but not so tight that it restricts your movement.
- Lace from bottom to top, making sure to tighten each loop as you go. This way, you can ensure that the protection is even and will cover your entire foot.
- Knot the laces at the top securely but not too tightly. This will help with stabilization and prevent the laces from slipping.
- Make sure to double-check your lacing to ensure that no crucial areas are left unprotected.
Overall, lacing up metatarsal guards can be daunting, but by following the tips and advice outlined above, you can ensure that you avoid the common mistakes and get the protection you need for your feet.
By the way, if you don’t want to go through this procedure rather looking for an easier solution then you should buy the most comfortable metatarsal boots. We have reviewed some good ones. Please read it here.

Frequently Asked Questions
How Do You Tie Metatarsal Guard Laces Properly?
To tie metatarsal laces, start by tightly lacing up the bottom three or four eyelets, then weave in and out of each eyelet up to the top. Once you reach the top, cross the laces and feed them under the opposite sides before tying them into a knot.
How Tight Should Metatarsal Guard Laces Be?
Your metatarsal guard laces should be tight enough to secure your foot inside the boot and prevent it from slipping. However, they should not be too tight that they restrict your blood flow or cause discomfort. You should be able to wiggle your toes comfortably inside the boot.
What Are The Best Laces For Metatarsal Guards?
The best laces for metatarsal guards are those that are strong, durable, and can withstand the tough demands of the job site. Flat laces are the most common type of laces used in metatarsal guard boots because they are strong and stay tied for longer.
Look for laces made of materials like nylon or kevlar for added strength.
Should You Double Knot Metatarsal Guard Laces?
Double knotting your metatarsal guard laces is a personal preference. If you find that your laces are constantly coming undone or you’re afraid that they might come undone while working, then double knotting can be a good option to keep them securely tied.
However, make sure the laces are not too tight that they cause discomfort.
How Long Should Metatarsal Guard Laces Be?
The length of your metatarsal guard laces will depend on the height of your boots and the number of eyelets they have. Generally, you’ll need laces that are between 54-72 inches long for most metatarsal guard boots. It’s better to have laces that are too long than too short, as you can always adjust them to the desired length.
Conclusion
Ensuring your metatarsal guard is properly laced up is crucial for personal safety and comfort on the job. Taking the time to adjust the laces correctly before each use will ultimately pay off in the long run, as it will mitigate any risks of injury.
Don’t forget to identify your foot problems and adjust the laces accordingly to relieve pressure on your foot, if necessary. From our discussion above, we hope that you have a good understanding of how to lace up your metatarsal guard perfectly.
Remember, it is much easier to prevent an injury than to recover from it, so take the time to do it right. Happy work, happy feet.
Read also: Best Pull On Work Boots For Concrete
Read also: 10 Best Work Boots For Lineman in 2021 [Authentic Review]
1 thought on “How To Lace Up Metatarsal Guard Perfectly”
Comments are closed.